NEM651: The 6-pin decoder socket standard

nem651Symbol
Logo you may find on packaging indicating it has a NEM651 connector.

This post has translated abstracts of the European NEM Model Railway Standards. It’s not a 1:1 transcript.

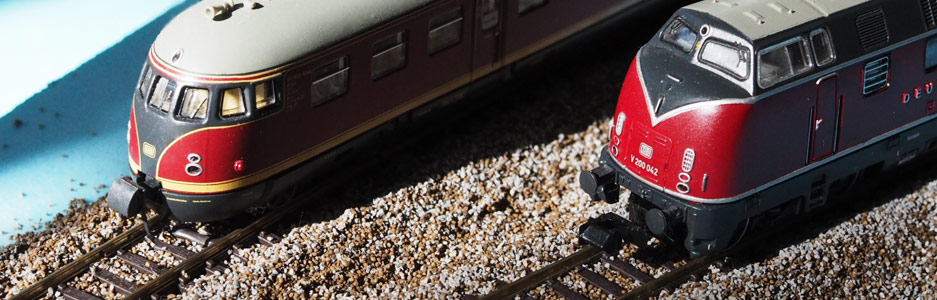
With a bewildering variety of replacements underway, plux12, next18, mtc14.. this is still the grand daddy for (European) N Scale locomotives and a poster child for having the luxury of a standard with interoperability and a wide choice of decoders.

Many locomotives available on eBay are extremely easily to convert when they sport one of these. With older locomotives without a connector, you may need to do a bit more and understand the schematics. Many decoders sport pretty good instructions for it, but if not the NEM 651 standard itself can help you on your way.

The better decoders are protected from the effects of plugging them in wrongly or shorting outputs, but not all – so be careful. Often the nr.1 pin is marked visibly, but sometimes matching the chip layout to the instruction schematics is the only way.

The 6 pins connect the power to the engine plus two outputs – which are assumed to be the front and back lights. Some brands have extra outputs which can be soldered onto the edge of the decoder’s PCB. The size of just the PCB is typically between 10-14mm long, 8-10mm wide, and 1.5-2.5mm height. Depending on the brand, you may get the decoders as a direct 6-pin plug, or with flat cable or individual cables / plug – or they offer any of these.

Here’s a schematic to illustrate the pin assignment:

nem651_schematic
For installation, always refer to the decoder instructions, and the instructions for the particular train.

nem651Analog
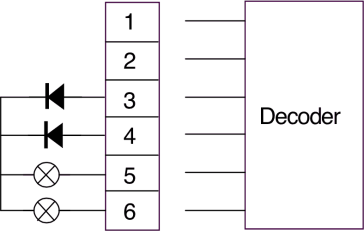
A note from the NEM651 guide to maintain full lighting compatibility with analog layouts, the common wire for the lights should not be connected straight to the rail, but like this:

Links to NEM651 DCC decoder manufacturers / brands

(Please feel free to let me know of brands not included, in the comments)

NEM 302: Weight of railway carriages

This post has translated abstracts of the European NEM Model Railway Standards, applied to N scale.

NEM 302 describes the advised weight for carriages (no engine) so that they are least likely to topple over. While it’s partly targeted at manufacturers, it does deal with making your layout more reliable, so I thought it be worthwhile. The factors that negatively impact the chance of toppling and derailing are:

  • High centre of gravity
  • Buffers sticking out (distance between axle and the buffer) – and locking up
  • Coupler not near the axle or bogie, creating torsion
  • Coupler mounting on bogie
  • Canted tracks (see NEM114)
  • Sharp Curves

The advised weight per mm of length, measured buffer to buffer is 0.17 – 0.22 gram (minimum/maximum). Adding weight or freight, low in the vehicle, can increase stability in the cases listed above.

nem302NEM 302 also recommends that manufacturers of carriages with higher-than minimum weight, should make the ballast easily adjustable for their customers.

NEM 201: Overhead Wiring Geometry

This post contains translated abstracts of the European NEM Model Railway Standards, applied to N scale.

European overhead wiring has quite narrowly defined geometry in regards to how much it can zig zag and bob but a bit less defined in height. Especially in model railways, the allowable/useable width has a direct influence on the distance between support posts as a result of the strongly reduced track radiuses.

The are two prevalent system in Europe: wide (S=3.5) & small (S=1.5)

Wide is used, for example, in Austria and Germany with wider 1950mm (~12mm scaled) pantographs, the zig zag here is 300 or 400mm (that’s 1.9mm for high speed tracks and else 2.7mm each way).

Small is used in countries that include France, Italy and Switzerland. They use smaller 1450mm pantographs (9mm) and the zig zag in Switzerland is 150 or 200mm (that’s 1mm for speeds over 125km/h and 1.3mm for below).

Note: It doesn’t look like manufacturers model this difference in N Scale – and stick to a wide profile for pantographs.

nem201

On normal tracks, the height should be the standard 38mm and zig zag in roughly 2/3rd of the maximum allowed variance. Actual railways may use more height around and in stations, while a lower height is used in tunnels, low clearance areas and on high speed tracks (usually lacking level crossings too). Suppliers of overhead masts in Europe all seem to have the standard 38mm.

Maximum possible Distance Between Supports – based on curve radius

nem201CatenaryThe formula for this Lmax = 4*SQRT(R*S). So taking the wide system with S=3.5 and a 400mm curve, Lmax = 4*SQRT(400*3.5) = 150mm. Be sure to to place the support poles outside the clearances for curves (NEM103 and NEM102).

Dutch Railways Example:
With the Dutch Railways (NS), support posts are usually 438mm apart, the zig zag is 1.9mm in scale. Double track sections for up to 160km/h, usually have supports spanning both tracks, rather than a pole on each side.

NEM 114: Superelevation / Canted Tracks

This post contains translated abstracts of the European NEM Model Railway Standards, applied to N scale.

This could be the shortest abstract 🙂 While real railways use super elevated curves to alleviate the pressure on the outer rail and make negotiating curves more secure, none of that is needed in model railroads. But, if you still want those great looking curves and not have your cars topple over, NEM 114 advises to keep the outer rail not over 0.6mm higher than the inner rail.

nem114When transitioning into a curve make the change gradual. Might not be easy in N scale. Use the same transition length L as advised in NEM113 Smooth Curve Transitions: that means at least longer than the longest car length.

NEM 113: Smooth Curve Transitions

This post contains translated abstracts of the European NEM Model Railway Standards, applied to N scale.

If we forget S curves for a moment, you will find that the point with the most stress on couplers, is where a straight transitions into a rather sharp curve. nem113BThis is most pronounced when one car is on the straight, and the other completely on the curve. In the photo you can see this effect, with car 1 on the left swinging out opposite to the direction of the curve. Car 2 will get a strong correction when entering the curve! Note that this photo is of two 120mm long carriages going into 457mm turnout – not the worst of situations (see my article on curve recommendations)!

A solution for this is to gradually transition from the straight into the curve: it will gently nudge the wheels and coupler producing less derailments and all carriages will look much better in the process. The smaller the curve, the more relevant this is. nem113A

The result for the same 457mm curve:nem113Result

NEM113 advises to especially apply transitions in curves under 540mm radius, for through-tracks in stations and on main and branch lines (‘auf der freien strecke’) . You can either take your original curve with radius R and run it ‘f’ wider at the end, or you can reduce the original radius R with ‘f’ and end up the same. S Curves that use these transitions do not need a straight in between.

To get the measurements of ‘f’ and ‘L’ for these transitions NEM113 describes a formula with two variants.

Variant (1) is the recommended one where f=4mm (the curve comes 4mm wider eventually than with no transition) and L depends on the radius of your curve. The formula is L=SQRT(f*24*R) with R being the radius in mm.

Variant (2) is where the transition length L is set arbitrarily – with the condition that L > longest wagon and that L/R > 0.6 (the radius is at nearly twice the transition length). This variant can end up more compact. The formula for this is f=(L*L/24/R)
nem113Curve

To layout your track, lookup L or f in the curve-table below. Then look at the graph above. At Point A you will be ½f up and ½L in, at Point B you will be 2f up and 0.81L in. Finally at T-end you are 4f up. You can find exit angle of your track at T-end in the table as well.

Here’s the table for a variety of curves in scale N – applied with both Variant 1 (grey) and 2:

nem113Table

Track laying using a flexible guide tool.
nem113ToolSimulate it with Standard Geometry Track
nem113FixedGeo

Realistic Platform heights and widths – addition to NEM standards

This post contains translated abstracts of an older German railroad directive and this MIBA article on platforms here – applied to N Scale.

You may wonder how long, wide and high platforms are in Europe.. and there won’t be one answer. Depending on the time (older=lower), country and size of the station, it can be nearly anything. On this page you’ll find dimension for platforms as occurring now and last century in Germany, translated to N Scale. The 550 and 760mm platforms are also set in a European Standard for high speed train platforms, so I think the geometry can be quite useful to get an idea for what kind of size platforms have in 1:160 (and then go for the compression you may want to apply!). Note that these are not part of the NEM standards, and that for example the track-centre to platform distance is recommended as 11.5mm – which is less than the NEM standard yet closer to reality (and less gap to mind for the ‘preisers‘).

Platform Heights (above rail height):
2.4mm – 380mm platform as found in small stations (<25 trains a day)
3.5mm – to represent 550mm platforms
4.8mm – for 760mm platforms found in the large stations
6.0mm – 960mm S-Bahn station platforms (just a guess, Sydney Stations too)
8.0mm – for goods / loading ramps

Minimum Platform Widths, by type, with track-centres distance.

platform_widths

(1) The main platform of a station is at least 7.5m, or 47mm in 1:160. And wider if much traffic passes. 

(2/3) An outside platform is at least 18mm, however with more passing traffic, 28mm is recommended.

(4) This older type of platform, is usually quite low and is used for one track only. The track distance there is 6m or 38mm in N-Scale.

(5) An island platform that is used on both sides, but with passenger exiting at the end on a terminus, or with a level crossover somewhere has a track-track distance of 9m or 56mm.

(6) When an island platform has stairs (16-25mm wide) or other buildings and constructions, at least 16mm clearance is kept on either side.

Related: Straight Track Clearances NEM102

NEM 112: Track – Track Distance

This post contains translated abstracts of the European NEM Model Railway Standards, applied to N scale.

I’ve seen many people slugging this out on forums, but here are the recommended centre-centre track distances according to NEM112:

In stations: 28mm
In the field / main line: 25mm
In curves: depends on radius and maximum car length – see below

In curves under 700mm radius, you may need more clearance to account for the carriages hanging over and sticking out. Here’s the guide for that:

nem112

Example: if your curve has a 325mm radius and non of your carriages are over 125mm, you can use a track-track distance of 26mm to have enough clearance.


An alternative guide as per an older German Railways (DRG) directive:
Distances are in 1:160 Scale, the actual distances are 4.50m / 4.75m / 5.00m / 5.50m:

  • 28mm minimum distance, 30mm recommended
  • 31mm for normal lines outside stations
  • 34mm for car wash tracks and engine / wagon sheds

NEM 111: Minimum Curve Radius

This post contains translated abstracts of the European NEM Model Railway Standards, applied to N scale.

Here are the minimum curve recommendations as per NEM 111 for N Scale, according to type and/or the maximum of length of carriage on the particular curve. The NEM works with 3 categories of lengths, up to 125, 151 or 170mm.

The essence for wagons with fixed axle wagons is that their wheel are never more than 12 degrees out compared to the rails. To accomplish this, make sure the radius is always more than at least the minimum radius.  The below table is suited for both wagons with fixed axles and those with bogies:nem111


The alternative guideline: what will actually look good and work well?

Having browsed some publications (Model RailRoader Hobbyist Q1 2009) and having experimented a bit, I really like this advice based just on the carriages length (L) + and what visual impact you are after.

L x 2: minimum curve, very toy-like appearance, may derail
L x 3: recommended for reliable operation
L x 3½: carriages look decent from the inside (having the smaller gaps)
L x 4: carriages look decent from the outside
L x 5: carriages look pretty good from the outside, coupling starts to work

A couple of Europe-based examples to illustrate how epoche/period and carriage type can influence the visual impact:

Post roughly 1955, the now standard 26.4m passenger coaches started to appear. These are 165mm long in N Scale. So applying the above,these will look decent looking from the inside on a 3.5 x 165mm = 578mm (23″) curve. If we do the same for the longest pre-1955 four axle coach of 131mm and this comes down (nearly) to the radius of medium Peco turnout (457mm / 18″). Take a reasonable length 88mm goods wagon and you are looking at a 308mm radius for the same visual impact.  Of course such goods wagons will look pretty good (x5) on 457mm curve.

NEM 103: Clearances in Curves

This post contains translated abstracts of the European NEM Model Railway Standards, applied to N scale.

In curves, additional clearance (E) is needed depending on the maximum carriage length used on your layout and the curve radius.  Smaller radiuses and larger carriages need more clearance.

nem103A
Table for the extra clearance E depending on radius + carriage length.

When transitioning from a straight to the curve (apart from an actual curve transition – see NEM 113), some extra clearance on the straight is also needed, see the below diagram for how that works. Note that either the 126mm or the maximum bogie/axle distance – which ever is most –  applies for the transition area. nem103BRelated NEM guides:

102: Clearances for Straight Track
112: Track to Track distance in Curves
113: Transition Curves

NEM 102: Clearances for Straight Track

This post contains translated abstracts of the European NEM Model Railway Standards, applied to N scale.

NEM102 describes the recommended clearances for problem free movement of rail vehicles on straight tracks. All distances are in mm and heights are measured from top of the track. Note that the overhead wire can be between 34 and 40, but the standard for this is 38mm (NEM201/202). Here’s the picture for N scale:nem102