I had a go with building a platform from 2mm sheets & 3x10mm Balsa Wood sticks. For some formal recommendations regarding platforms sizes and clearance see my earlier platform article and NEM102/103 for clearances.
Pitfalls & recommendations for platform clearances
Look at the maximum play of the already very wide Minitrix BR85, a 1’E1′ heavy locomotive.
My own recommendation for clearances, if you are not running steam locs, is to run with the widest trains and in sharper curves also with the longest carriages before building. However, if you intend to run steam engines – as I found out, they may have the cylinders and drivers stick out further than anything else and then, because the manufacturer has given each axle quite some play to deal with tiny curves, the loc can stick outside even the already wide official clearance profile (about 7mm from the outside rail).
Luckily Balsa wood is easy to cut with a sharp knife so you can correct it all somewhat if you do get into trouble.
Having never worked much before in N Scale I found myself looking up clearances for tunnels, platform heights.. but also discover many ‘N’ products are not so ‘N’ after all, so how to get it a bit consistent and ridiculously good looking?
Looking at forums I am not alone: many ask how wide a road is and so – and I see plenty of modelled unpaved country roads where a bus could perform a 3 point turn with ease. However I found an easy solution that works well for me.
The whiteboard marker is huge! The HO trees are just right in N.
So yes, for this method buy one little N-dude and a VW Beetle that are in truly in N Scale. Mine was one Preiser and an Oxford die-cast Beetle. Take a muscle car if you like – which reminds me .. 🙂 It’s larger size will fit more modern layouts better.
Simply place it next to what you are building or buying and it will become immediately obvious if it’s going well or not. It’s easier to judge the path, road, the back road from this then anything else.
Yup this will work. The fences are a bit overdone but pass. The council may approve.And the result after laying down some bitumen (fine ballast + foam putty mixed with paint)
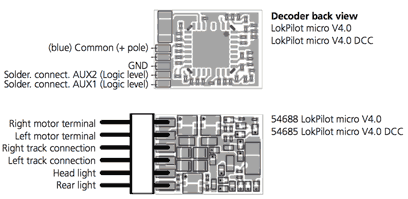
I have had these (non-sound) decoders for a while now and experimented with them for hours using the Fleischmann VT12.5 (from 2014) and the Roco V200 (2003) to see which is best. Reason why I did this that I wanted to settle on one decoder, with only one set of CVs to (vaguely) remember.
Both these decoders are top dog and both have their strengths! I will apply a 250 point scoring method for decoders to determine a winner.
Here’s the outline on the scoring method:
– 80 points can be awarded for price & documentation quality / ease of use
– 80 points for driving characteristics, especially slow driving & speed control
– 60 points for features, such as extra ports, mapping and lighting effects..
– 30 points are for nice to have or special features
A week or two ago I finalised my layout design. The centre piece is station Titisee on the Höllentalbahn in Germany and where the 3 Seenbahn (3 lakes line) branches off the (single track) main line. The modelled time period is from 1955, with the station layout being slightly adjusted from the situation in 1955.
Since I am always on the lookout for a great solution at a fair price, I wanted to have a look at the Kuhn couplers. While designed for TT scale, as an alternative to the Tillig coupler**, it does use the N Scale NEM 355 coupler socket. At a price of around 20 euro (21USD/27AUD) for 24 couplers these are cheaper than almost any other coupler. What interested me is that these are fairly slim looking and have a metal hook which may open it up to (electro)magnetic decoupling. This is the one thing I haven’t tried it yet – but I’ll update this when I do.
** in fact, it's extremely similar in design to the Tillig TT coupler
Because I read a heated debate on this on a Dutch forum and I’ve got a reversing loop and a turntable to sort out in terms of managing the polarity on the tracks, so here’s a small article with some solutions and things to consider.
Just to be complete, here is the drawing for the situation with the an (electrofrog type) turnout when straight and when diverging.
And here are the 4 basic solutions I came across:
A module that detects a short circuit and quickly/gently tries the opposite polarity before the short does damage or harms the general operation.
A module that has sensors to detect the train movement and swaps polarity so no short happens.
Use detectors and logic or routing software (wether on PC or on chip) so the locomotive path is known, which can drive a relay or other component to swap polarity. It’s similar, but more indirect than 2.
This post is an extract of the European NEM Model Railway Standards.
NEM 122 is a guideline how to dimension a railway trackbed for normal gauge tracks, for both the foundation and the track + ballast. The foundation can be adjusted as necessary when dealing with structures such as rock cuts and retaining walls.
Notes:
The 16mm width only applies to wooden sleepers.
For double or multiple track lines, the ballast can be level between the tracks.
Signals and catenary masts can placed in the ‘ditch area’ as long as they’re not in the clearance spaces as defined in NEM102 and NEM103.
Example: my Peco code 55 tracks are 2mm in height, which means the underlay (ballast) is to be 6-2=4mm thick according to the NEM Standard
Update: The realistic guide
Doesn’t come close to any standard, yet this photo is quite typical for the whole line – the Höllentalbahn in Germany which also features inclines of over 5% (yes percent).
You may have guessed: Just look at the area or photos from the area, notice the colour of the ballast and it’s variations – yes, it’s never one colour out of a packet. Nature has infinite variations usually. Also notice the contours of the trackbed, does it run off flat or steep. Is it really 6mm – or 3ft / 94cm higher in reality? And how about near a station? Get an impression and with that in the back of your mind, ballasting becomes a lot more intuitive and you are on your way to a better looking layout.
Just a quick heads up, you can use the Z21 maintenance tool on your Mac with Crossover. It works just as you’d expect and sits as an app normally would.
For those who don’t know CrossOver – it’s the payed-for equivalent of Wine which allows you to run Windows programs without needing a Windows license – and share drives, use installed printers, copy-paste. I simply downloaded the Z21 software, clicked the .exe which had CrossOver ‘install’ it so it can be used like a Mac App.
Connecting the feedback module to the Z21
As you can spot above as well, the occupancy signal from the Digikeijs 16 channel detector modules comes through with track section 1 & 2 occupied. I received the modules today, and they work very well: connect a loconet type cable to the module, insulate one rail for each section and power it through the module. Job done. Setup is with the Z21 tool (the ‘assign’ address button in the picture above) Here’s a photo of the module. Its a compact device about 80x90mm and about 23mm thick. I’ll post a full review in the near future.
When looking at extending or creating a layout some items can really start multiplying the costs and/or headaches. Take a turnout: there is the turnout itself, a point motor, a decoder and/or a switch or buttons, switch the polarity of the frog and maybe a LED/lamp on a nice panel. As you can suspect, your choices may make a lot of difference, in installation, reliability (unless you love repairing), costs and maybe even sanity!
So then to the topic, blocks – because these tend to get numerous in a hurry. I am not very experienced with these but I’d say a conservative guess is that anyone will end up easily with 2x the number of turnouts, or more if you have multiple sensors per block. If you want to know more about what to plan, how many sensors you need, have a look at the manual for software like Traincontroller – it will explain what it can do with each option.
Type of block detection One widely used method is current detection because it is easy to add detection for non-locomotives: most detectors will report a current from 1mA, so by mounting a small resistor between the wheels of a carriage and it can be detected. Other types do detection by a reed switch that can detect magnets, or based on light or infrared detection that gets interrupted by the train driving through the detection line.
Comparison of current-based block detections I chose for the current-sensing type, so I am going to create a list of different brands/types. The prices are in Euro – and do not reflect local prices, exact quality, or shipping costs, and are mainly to compare and illustrate how large the opportunities for you are – and to possibly introduce you to some suppliers or products that you may not have heard of (they don’t pay me – I am just happy I found them and making it affordable).
You choice in the end, also depends on what you already have, you are likely to look for solution on a communication bus that is easy to connect to (RBUS/Loconet/NCE). Most systems I have seen can connect to Loconet (at least have an extension for it), which in turn can give you easy access to the generally affordable S88N (improved reliability, but compatible with S88) plus all kind of controllers and accessories detectors. For the Roco Z21 that I use, I can go Loconet or Roco RBUS, or both – the connectivity of the Z21 is one of the reasons I chose the Z21. Anyway without further ado, cast your eyes on this comparison: I don’t think it needs much explanation. My apologies to ESU, their current sensing does get cheaper if you had say 20 contact rails already, and you’d like to extend from there. Here are some links to the website of companies with alternative offerings.
Digikeijs website and online shop. Manuals in 4 and website in 3 languages. I have purchased their R4088RB-CS block detectors, so when I have those up and running, you can expect a review.
LDT website and online shop. Website in German and English. Has DIY and Ready made options. Make sure you understand the specifications.
Uhlenbrock. In German only and – this is a friendly warning – they have put most attention in their products, not their website. You may want to look for their products on larger online model railroad shops, like Lippe Modellbahn – that have English translations and overseas ordering options.
DIY Hans de Loof designs.
Two four section current detectors from Hans de Loof (after assembly). You will still need his Loco IO or S88 to read it’s 5V logic outputs.
Has a range of DIY Loconet designs. You can buy the PCBs with components from a Belgian shop – linked through on his website. It’s in 4 languages. I will review two of his products later as I have just build them, but they’re not as cost effective as some of the options above. It seems that times have changed now that experienced electronics engineers had a look at the solutions being offered and started innovating, such as the father and son who started Digikeijs. The result is that we now have full featured products with 2 year guarantee, at the same, or lower than the DIY prices of today.
With thanks to Pierre from the locgeek.com website; he has directed me to some of these companies and you can find reviews of many products on his blog / website too.
Logo you may find on packaging indicating it has a NEM651 connector.
This post has translated abstracts of the European NEM Model Railway Standards. It’s not a 1:1 transcript.
With a bewildering variety of replacements underway, plux12, next18, mtc14.. this is still the grand daddy for (European) N Scale locomotives and a poster child for having the luxury of a standard with interoperability and a wide choice of decoders.
Many locomotives available on eBay are extremely easily to convert when they sport one of these. With older locomotives without a connector, you may need to do a bit more and understand the schematics. Many decoders sport pretty good instructions for it, but if not the NEM 651 standard itself can help you on your way.
The better decoders are protected from the effects of plugging them in wrongly or shorting outputs, but not all – so be careful. Often the nr.1 pin is marked visibly, but sometimes matching the chip layout to the instruction schematics is the only way.
The 6 pins connect the power to the engine plus two outputs – which are assumed to be the front and back lights. Some brands have extra outputs which can be soldered onto the edge of the decoder’s PCB. The size of just the PCB is typically between 10-14mm long, 8-10mm wide, and 1.5-2.5mm height. Depending on the brand, you may get the decoders as a direct 6-pin plug, or with flat cable or individual cables / plug – or they offer any of these.
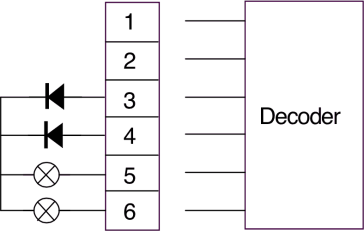
Here’s a schematic to illustrate the pin assignment:
For installation, always refer to the decoder instructions, and the instructions for the particular train.
A note from the NEM651 guide to maintain full lighting compatibility with analog layouts, the common wire for the lights should not be connected straight to the rail, but like this:
Links to NEM651 DCC decoder manufacturers / brands